

Have you ever craved a dessert that’s as visually stunning as it is delicious? Imagine a treat perfectly fitting your hands, crafted carefully and designed to bring joy. This is the essence of the bento cake, a delightful creation inspired by Japanese culture and modern baking trends.
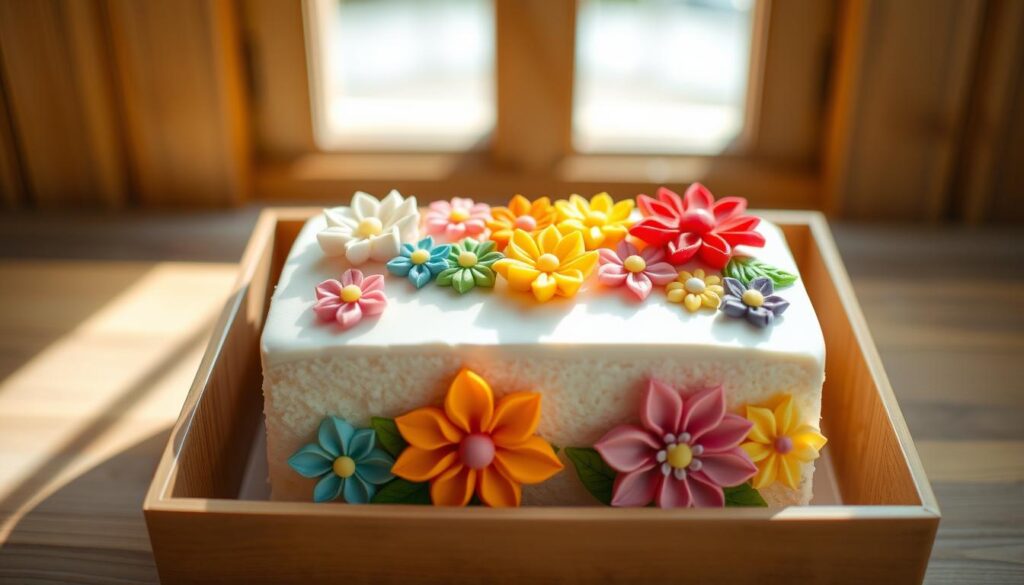
Originating from the concept of bento boxes, these mini desserts are baked in a 5-inch tin, making them ideal for personal gifting or a special indulgence. Layers of soft sponge, often infused with flavours like vanilla, are paired with smooth American buttercream, creating a harmonious blend of taste and texture.
What sets this treat apart is its creative presentation. Inspired by tutorials from Cakes by Lynz, each piece is a work of art, designed to suit modern food trends. Whether you’re a baking enthusiast or simply looking for a unique gift, this recipe offers everything from batter preparation to creative packaging ideas.
Table of Contents
Introduction to Bento Cakes
Discover a charming dessert that combines artistry with practicality. Are a delightful fusion of traditional baking and modern trends. Perfectly sized for personal enjoyment or gifting, they’ve quickly become a favourite among dessert enthusiasts.
What Is a Bento Cake?
Originating from the Japanese term for lunchboxes, a bento cake is a miniature dessert baked in a 5-inch tin. These treats are designed to be compact yet visually stunning, often featuring layers of soft sponge and smooth buttercream. Their small size makes them ideal for individual servings or thoughtful gifts.
The Concept Behind Miniature Cake Treats
The idea of mini cakes evolved from the popularity of 4-inch desserts, which were adapted to fit into cupcake boxes for convenience. This innovation allows for creative packaging and easy transport. The simplicity of these treats also opens up endless possibilities for personalisation, making them perfect for any occasion.
Detailed tutorials, like those from Cakes by Lynz, provide step-by-step guidance on how to make bento cake. From preparing the batter to decorating and packaging, these resources ensure you can create a professional-looking dessert at home. Whether you’re a seasoned baker or a beginner, this cake recipe is approachable and rewarding.
Understanding the Japanese Bento Tradition
The Japanese bento tradition is a fascinating blend of culture and creativity. Originating as a practical way to carry meals, bento boxes have evolved into an art form. Their influence extends beyond lunchboxes, inspiring modern culinary trends like miniature desserts.
Bento Lunch Boxes in Japanese Culture
In Japan, bento boxes are more than just containers for food. They reflect meticulous preparation and a deep appreciation for aesthetics. Each compartment is carefully arranged to create a visually pleasing and balanced meal. This attention to detail has inspired the design of modern desserts, particularly in layering and presentation.
Traditional bento boxes often feature a variety of colours, textures, and flavours. This approach translates seamlessly into dessert-making, where layers of sponge and buttercream create a harmonious balance. Piping techniques further enhance the visual appeal, mirroring the precision seen in bento arrangements.
Modern desserts, like the mini treats inspired by bento boxes, emphasise form and action. Just as a bento box is designed for portability, these desserts are crafted to fit perfectly into a lunchbox or cupcake container. This blend of tradition and innovation makes them a unique culinary experience.
| Traditional | l Bento Box, Modern | n Dessert Trend |
|---|---|---|
| Presentation | Compartmentalised, balanced arrangement | Layered structure with smooth finishes |
| Aesthetic | Colourful and visually appealing | Custom buttercream and piping designs |
| Functionality | Portable and practical | Compact size for gifting or personal use |
Understanding the cultural roots of bento boxes helps you appreciate the artistry behind modern desserts. By incorporating these principles, you can create treats that are not only delicious but also visually stunning.
Gathering Your Ingredients and Equipment
Whether you’re a seasoned baker or a beginner, having the right tools ensures your dessert turns out perfectly. Let’s explore what you’ll need to get started.
Essential Ingredients for the Perfect Sponge
Every great bake begins with quality ingredients. For the sponge, you’ll need:
- Self-raising flour: Provides the structure and rise.
- Caster sugar: Adds sweetness and helps create a light texture.
- Butter: Ensures richness and moisture.
- Eggs: Bind the mixture and add fluffiness.
- Vanilla extract: Enhances flavour with a subtle aroma.
Precise measurements by weight are crucial for consistency. Using a digital scale ensures each cake layer is uniform in size and texture.
Tools You’ll Need
Equally important are the tools that make the process smooth and efficient. Here’s what to prepare:
- 5-inch cake tin: The ideal size for a compact dessert.
- Mixing bowls: Mix ingredients thoroughly.
- Electric mixer: Ensures the batter is light and airy.
- Spatula and measuring tools: For precision in every step.
Investing in quality equipment avoids common pitfalls and ensures professional results. You can follow expert tutorials to gather everything you need efficiently.
By starting with the proper foundation, you’re setting yourself up for success. Each ingredient and tool is vital in creating a delicious and visually stunning dessert.
Preparing Your Cake Batter
Mastering the creation of a light and fluffy sponge is the foundation of any great dessert. The mixing process is crucial, as it determines the texture and rise of your final product. I’d like you to follow these steps to ensure your batter is prepared for baking.
Mixing Techniques for a Fluffy Sponge
Start by creaming the butter and sugar together until pale and fluffy. This step incorporates air, which is essential for a light texture. Gradually add the eggs, one at a time, ensuring each is fully incorporated before adding the next. This prevents the batter from curdling.
Once the eggs are mixed in, add the vanilla extract for flavour. Sift the self-raising flour into the mixture to avoid lumps. Gently fold the flour using a spatula to maintain the airiness of the batter. Overmixing at this stage can result in a dense sponge.
Pay attention to the batter’s consistency. It should be smooth and flow easily off the spatula. If it’s too thick, add a splash of milk to loosen it slightly. This ensures even baking and a well-risen result.
Expert bakers recommend beating the mixture for around 30 seconds after each addition. This ensures an even texture and prevents overmixing. Following the recipe precisely is key to achieving a delicious outcome.
| Common Mistake | Solution |
|---|---|
| Overmixing the batter | Fold ingredients gently to retain air. |
| Adding eggs too quickly | Incorporate eggs one at a time. |
| Incorrect batter consistency | Adjust with milk if too thick. |
Following these techniques, you’ll create a batter to pour into the tin and bake perfectly. Remember, patience and precision are your best tools in this process.
Baking Your Perfect 5-Inch Bento Cake
Achieving the perfect bake requires attention to detail and the proper techniques. From preparing your tin to monitoring the oven, each step is crucial in ensuring your dessert turns out flawless. Let’s dive into the essentials for baking success.
Cake Tin Preparation and Oven Temperature Tips
Start by preparing your 5-inch tin. Grease it thoroughly with butter, ensuring every corner is covered. Dust the tin with flour, tapping out any excess. Line the base with parchment paper for easy removal after baking. This step prevents sticking and ensures a smooth finish.
Preheat your oven to 180°C. Position the rack in the middle for even heat distribution. Placing the tin centrally ensures uniform baking. Use an oven thermometer to verify the temperature, as accuracy is key to avoiding under or over-baking.
Bake the dessert for approximately 45 minutes. Check for doneness by inserting a skewer into the centre. If it comes out clean, your bake is ready. Look for visual cues like a risen top and a golden-brown surface. These signs indicate a successful bake.
If you use a fan oven, reduce the baking time by 5-10 minutes. Fan ovens circulate heat more efficiently, which can speed up the process. Adjusting the time ensures your dessert doesn’t dry out.
If you would like more guidance, please watch video tutorials. These resources provide practical demonstrations of tin preparation and oven techniques. They’re invaluable for visual learners or those new to baking.
| Common Issue Solution | n |
|---|---|
| Sticking to the tin | Grease and line with parchment paper. |
| Uneven baking | Could you position the tin in the centre of the oven? |
| Over-baking | Could you check the oven temperature and reduce the time spent on fan ovens? |
Attention to little tips and details ensures a successful bake. By following these steps, you’ll create a dessert that’s as delightful to look at as it is to eat.
Layering and Assembling the Cake
The art of layering transforms a simple bake into a masterpiece. Proper assembly ensures your dessert is visually appealing and structurally sound. I’d like you to follow these steps to finish a professional finish.
Cooling and Leveling
Before you assemble, please allow your bake to cool completely to room temperature. This prevents the layers from sliding apart due to residual heat. Once cooled, use a serrated knife to level the top. This creates an even surface, essential for stable stacking.
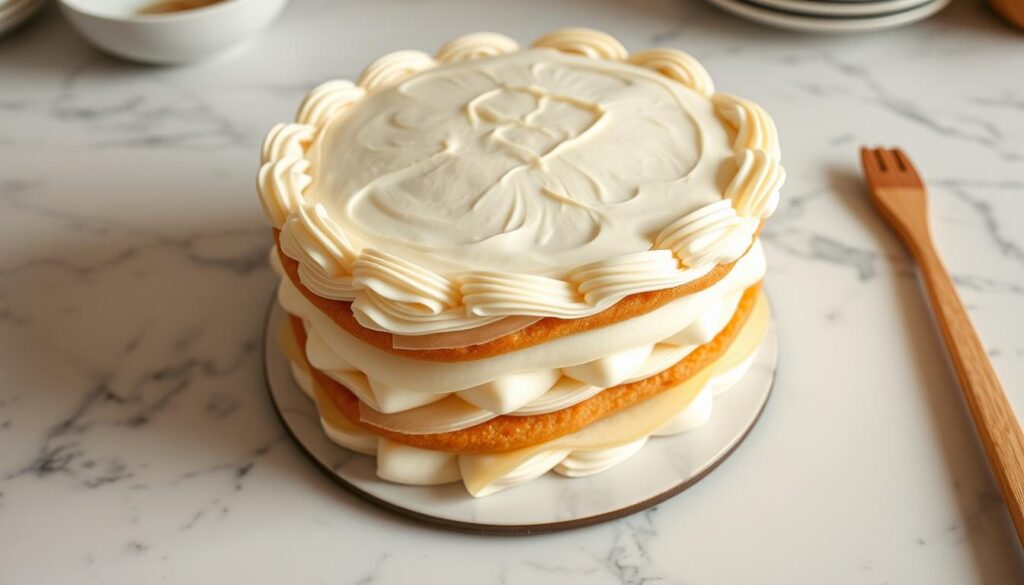
Layering with Buttercream
Place the first layer on a cake board or plate. Spread a generous amount of buttercream evenly over the surface. Add the next layer and repeat. Ensure each layer is aligned perfectly to maintain balance—a neat and stable structure.
Applying the Crumb Coat
Once layered, apply a thin crumb coat of buttercream. This seals loose crumbs and provides a smooth base for the final coat. Use a palette knife to spread the buttercream evenly, covering the sides and top. Chill the dessert briefly to set the crumb coat before adding the final layer of buttercream.
Common Errors and Solutions
One common mistake is rushing the assembly process. This can lead to uneven layers or a messy finish. Please make sure each step is completed with care. Another issue is improper leveling, which causes the layers to tilt. Using a serrated knife and a steady hand resolves this.
Creative Finishing Touches
For a final flourish, add a light sprinkle of decorative elements. Edible glitter, coloured sugar, or finely chopped nuts can enhance the presentation. These small details make your dessert truly special and personalised.
By following these steps, you’ll create a dessert that’s as beautiful as it is delicious. Patience and precision are your best tools in this process.
Decorating with Buttercream and Piping Techniques
Transforming a simple dessert into a work of art begins with the proper techniques. The final touches, from a smooth buttercream finish to intricate piping designs, can elevate your creation to the next level. Here’s how to achieve professional results at home.
Creating a Smooth American Buttercream Finish
Start by preparing your American buttercream. Ensure your butter is at room temperature for easy mixing. Beat it until light and fluffy, then gradually add sifted icing sugar. A splash of milk or cream helps achieve the perfect consistency.
To apply the buttercream, use a palette knife to make an even layer. Spread it smoothly over the dessert, ensuring no gaps or bumps. Dip the knife in warm water and glide it over the surface for a flawless finish. This technique removes imperfections and creates a polished look.
Advanced Piping Tips for Beautiful Swirls
Piping adds a decorative touch that makes your dessert truly special. Fill a piping bag fitted with a 1E tip for classic rosettes. Hold the bag at a 90-degree angle and apply steady pressure to create uniform swirls. For precision, practice on parchment paper before moving to the dessert.
Temperature plays a crucial role in piping. If the buttercream is too soft, chill it for a few minutes. If it’s too firm, let it soften slightly. Consistency is key to achieving clean, defined designs.
Experiment with colours and textures for a personalised touch. Layer different shades in the piping bag for a marbled effect. Use stencils or parchment paper guides to transfer intricate designs onto your dessert.
Video tutorials are an excellent way to refine your skills. Watch experts demonstrate techniques and follow along to improve your piping. With practice, you’ll master creating beautiful borders, swirls, and other decorative elements.
Creative Personalisation and Message Topping
Adding a personal touch to your dessert can make it truly unforgettable. Whether it’s a heartfelt message or a custom design, these details transform a simple treat into something extraordinary. Using tools like Sweet Stamp OutBoss and letter sets, you can create a dessert that’s as unique as the person receiving it.
Using Sweet Stamp Tools for Customisation
Sweet Stamp tools are perfect for adding a personal message or design to your dessert. Start by selecting a stamp that suits your theme. Press it gently onto the surface to create an embossed outline. This method ensures precision and consistency, even for intricate designs.
Use gel colours and tiny brushes to fill in the embossed letters or patterns for a more artistic approach. This technique allows for vibrant, detailed work. Please ensure your dessert is at room temperature before starting, as this helps the colours move smoothly.
If you prefer pre-made designs, Sweet Stamp offers a variety of letter sets and decorative stamps. These are ideal for quick yet professional-looking results. For the best outcome, you can just follow the instruction guide provided with the tools.
Personalisation doesn’t just make your dessert look good—it adds emotional value. Whether it’s a name, a date, or a special symbol, these details make each treat one-of-a-kind. Plus, Sweet Stamp often provides promotional discount codes, making it easier to experiment with different designs.
To ensure neat application, work slowly and carefully. Use a steady hand when filling in designs with gel colours. Balance your decoration by keeping the overall design simple yet impactful. These personal touches elevate the presentation and appeal of your dessert, making it a memorable gift or indulgence.
Packaging Your Bento Cake for a Special Presentation
Packaging your dessert thoughtfully ensures it arrives in perfect condition. The correct container protects your creation and enhances its visual appeal. Whether gifting or serving it, thoughtful packaging adds much to the overall experience.
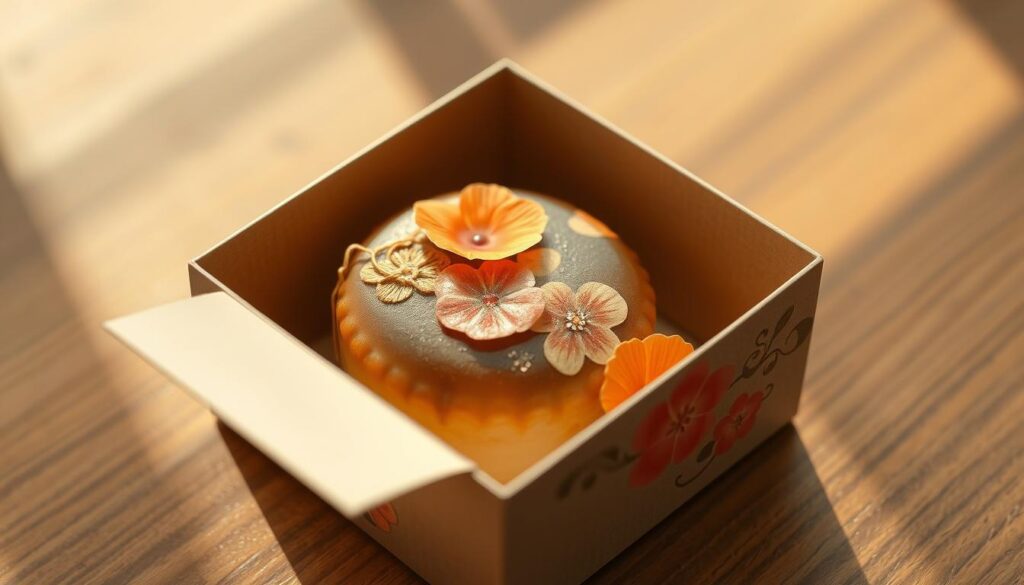
Selecting the Perfect Container
When choosing a box, consider both aesthetics and functionality. Traditional bento boxes are ideal for a cultural touch, while modified cupcake boxes work well for a compact cake. Please ensure the container is sturdy enough to hold the dessert securely during transport.
If you use a cupcake box, you may need to adjust the inner compartments. Carefully cut and reposition the inserts to fit the dessert snugly. This prevents movement and keeps the design intact. Could you line the box with parchment paper before placing the dessert inside for a polished look?
Transferring the Dessert Safely
Moving your creation into the box requires care. Use a flat spatula or palette knife to gently lift the dessert. Slide it onto a piece of parchment paper, then transfer it into the box. This method minimises the risk of damage to the decorations.
Could you place a non-slip mat or a small piece of non-stick material at the bottom of the box for added stability? This ensures the dessert stays in place, even if the box is tilted slightly.
Enhancing the Packaging
Consider adding a sugar-dusted finish to the dessert for a touch of elegance. Alternatively, sprinkle edible glitter or finely chopped nuts on top for a decorative effect. These small details make the packaging as appealing as the dessert itself.
Secure the box with a ribbon or a personalised tag for a thoughtful touch. If you’re using a bag for transport, ensure it’s padded to protect the dessert from bumps. Thoughtful packaging preserves the dessert and makes it a memorable gift.
By paying attention to these details, you’ll create a presentation that’s as delightful as the dessert inside. Thoughtful packaging ensures your creation arrives in perfect condition, ready to be enjoyed.
Tips and Tricks for Successful Bento Cake Making
Perfecting a miniature treat involves mastering a few essential techniques. Whether you’re a beginner or an experienced baker, these tips will help you avoid common mistakes and achieve professional results. From precise measurements to efficient tools, every detail matters.
Avoiding Common Baking Mistakes
One of the most frequent errors is not measuring ingredients by weight. Using a digital scale ensures consistency in your baked cake. Always use room-temperature ingredients, as they blend more smoothly, creating a better texture.
Another common issue is overmixing the batter. Fold ingredients gently to retain air and achieve a light sponge. When checking doneness, insert a skewer into the centre. If it comes out clean, your dessert is ready.
Time-Saving Techniques and Expert Advice
Preparing components in advance can save time. Measure dry ingredients the night before and store them in a bowl. Use an electric mixer for efficient mixing, ensuring your batter is light and airy.
You can invest in a good-quality piping bag and the right tip for professional results. A 1E tip is ideal for creating beautiful swirls and rosettes. Please practice on parchment paper before applying designs to your dessert.
You can watch detailed video tutorials for step-by-step guidance. Experts often share valuable insights on techniques and tools. Attention to small details, like using the right piping tip, leads to flawless results.
Additional Resources and Video Demonstrations
You can enhance your baking skills with detailed video tutorials and expert recommendations. Whether a beginner or an experienced baker, these resources simplify the process and help you achieve professional results. Every detail is covered from mastering frosting techniques to selecting the correct tin.
Step-by-Step Video Tutorial Overview
Video tutorials are an excellent way to visualise each step of the process. Platforms like YouTube offer comprehensive guides like those from Cakes by Lynz. These videos cover everything from preparing the batter to decorating with precision. Watching experts demonstrate techniques ensures you avoid common mistakes and refine your skills.
Key demonstrations include:
- Mixing and baking in a 5-inch tin for perfect results.
- Applying smooth frosting and creating intricate designs.
- Packaging your dessert in a cupcake box for a polished presentation.
Recommended Tools and Accessories
Investing in the right tools makes a significant difference. Essential items include:
- A high-quality 5-inch tin for even baking.
- Piping bags and tips for flawless frosting designs.
- Sturdy cupcake boxes for secure transport.
Brands like Sweet Stamp and Halo Sprinkles offer specialised customisation tools. These resources, available on platforms like Amazon, are perfect for adding a personal touch to your creations.
Following these tutorials and using the right tools will simplify the process and enhance your results. You can explore these resources to take your baking to the next level.
Conclusion
Creating a delightful miniature dessert is a rewarding experience that combines creativity and precision. Each step is designed to help you achieve professional results at home, from preparing the batter to decorating with buttercream. This guide has walked you through every stage, ensuring you can confidently make bento.
Personalisation is key to making your treat truly special. Adding a heartfelt message or custom design transforms it into a unique gift. Experiment with different techniques and share your creations with loved ones. The process is as enjoyable as the final product.
With the right tools and detailed instructions, you can master this Japanese-inspired delight. Whether a beginner or an experienced baker, this guide provides everything you need. Enjoy the journey of crafting a dessert that’s both beautiful and delicious.
Related Article: Irresistible Unicorn Cupcakes
FAQ
What is a bento cake?
A bento cake is a small, individual-sized dessert inspired by Japanese bento boxes. It’s typically a 5-inch treat, perfect for personal enjoyment or gifting.
What ingredients are essential for making a bento cake?
You’ll need essential baking ingredients like flour, sugar, eggs, butter, and vanilla. Buttercream, gel food colouring, and piping tools are necessary for decoration.
How do I prepare the cake tin for baking?
Grease the tin with butter and line it with parchment paper. This ensures the sponge releases easily and maintains its shape.
What’s the ideal oven temperature for baking a bento cake?
Preheat your oven to 175°C (350°F) for even baking. Always check the centre with a skewer to ensure it’s fully cooked.
How do I level cake layers for assembly?
Use a serrated knife or a cake leveller to trim the top of the sponge. This creates a flat surface for even layering and frosting.
What’s the best way to achieve smooth buttercream?
Use room-temperature butter and sift your icing sugar to avoid lumps. Beat the mixture until light and fluffy for a smooth finish.
Can I personalise my bento cake?
Absolutely! Use sweet stamp tools, edible markers, or piped messages to add a unique touch. Sprinkles and fondant decorations also work well.
What packaging is best for a bento cake?
You can choose a sturdy bento or cupcake box to protect your creation. Clear boxes are ideal for showcasing the design.
How can I avoid common baking mistakes?
Measure ingredients accurately, avoid overmixing the batter, and ensure your oven is at the correct temperature before baking.
Are there video tutorials available for bento cakes?
Yes, many step-by-step video tutorials are available online. These can guide you through baking, decorating, and packaging your treat.